JERZY DROZD COPPERSTONE
Installation Manual
Unpacking your COPPERSTONE
interchangeable 3 band onboard bass guitar preamp

Before installing the COPPERSTONE, please become familiar with the COPPERSTONE setup. Take a look at the picture below.
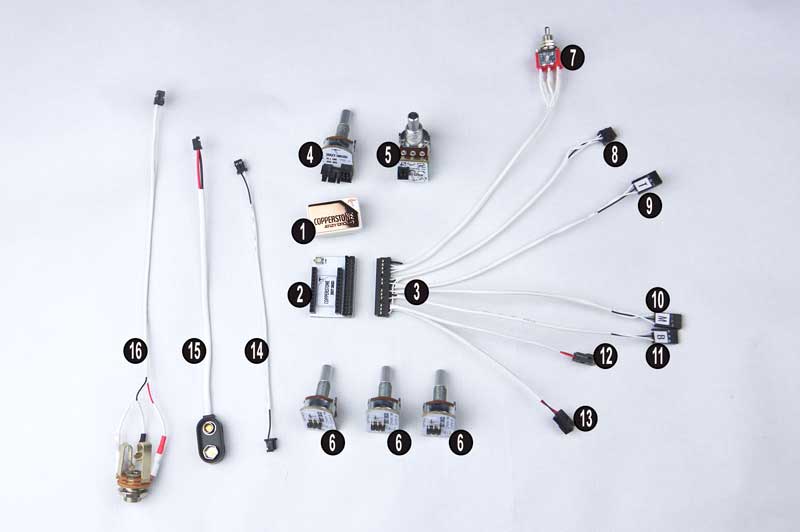
COPPERSTONE ELEMENTS
Each COPPERSTONE comes with the following elements:
- 1 x COPPERSTONE preamp (1)
- 1 x COPPERSTONE Baseboard (2)
- 1 x Wire Harnes (3)
- 1 x Master Volume Potentiometer (4)
- 1 x Blend Potentiometer (5)
- 3 x Eq Potentiometers for Treble, Mid and Bass (6)
- 1x 3 position Toggle switch for mid frequencies (standard are 250/500/1000Hz)
- 1 x connection cable for Blend Potentiometer (14)
- 1 x Battery clip (15)
- 1 x Jack output (16)
HARNESS CONNECTIONS
- Wire harness 30 pin connector to the baseboard (3)
- 6 pin connector to Master Volume (8)
- 3 pin connector to Treble EQ Potentiometer (9)
- 3 pin connector to Mid EQ Potentiometer (10)
- 3 pin connector to Bass EQ Potentiometer (11)
- Battery connector (12)
- FLAME (battery monitor) module connector (13)
- 6 pin connector to Master Volume (8)
- 3 pin connector to Treble EQ Potentiometer (9)
- 3 pin connector to Mid EQ Potentiometer (10)
- 3 pin connector to Bass EQ Potentiometer (11)
- Battery connector (12)
- FLAME (battery monitor) module connector (13)
COPPERSTONE BASEBOARD
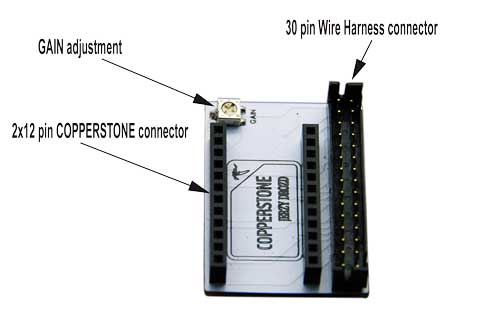
JERZY DROZD COPPERSTONE´s baseboard is a central piece of the COPPERSTONE system. The baseboard allows fast and easy COPPERSTONE preamps replacement. Due to its reduced dimensions (24mm x33mm), the baseboard will fit inside the majority of the bass guitar's electronics cavities. The baseboard can be installed at the bottom or on the wall of the electronics cavity using double stick tape.
GAIN ADJUSTMENT
The gain adjustment allows you to boost output signal up to 9dB. To boost signal turn trim potentiometer counter-clockwise CCW. To cut signal turn clockwise CW.
IMPORTANT: Please use the gain adjustment with moderation. The gain adjustment should be set to neutral if you use the active/passive switch.
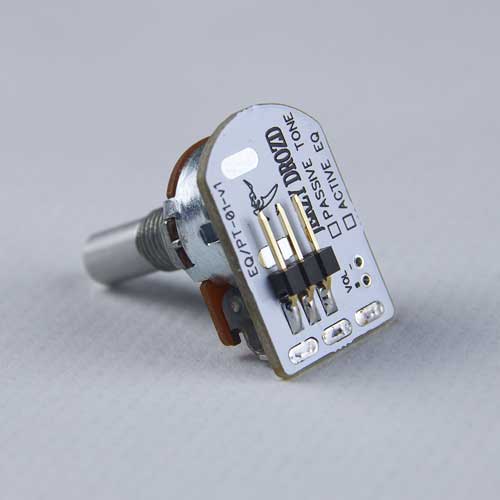
MASTER VOLUME - MODULE
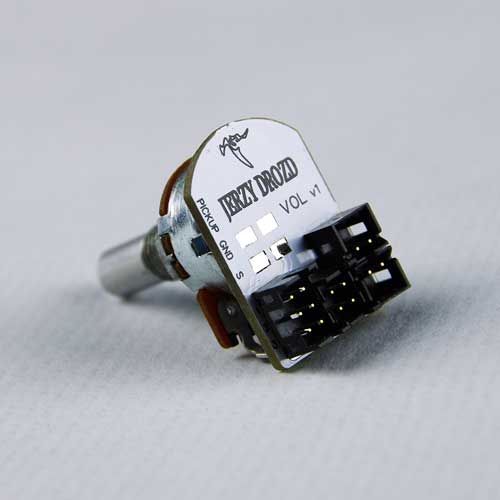
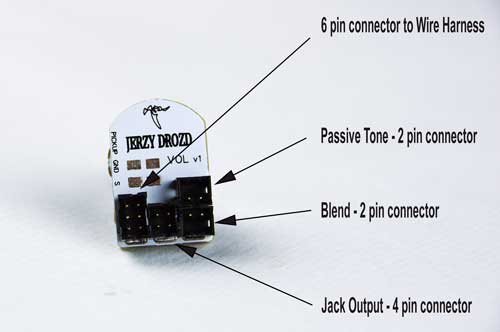
The Master Volume module is an important hub connector for three elements: Output Jack, Pickup Blend Potentiometer and Optional Passive Tone Module. It connects with the Wire Harnes through the 6 pin connector.
The connections are showed below. Please note that the passive tone and the pickups blend 2pin connectors are both interchangeable.
ACTIVE EQ - MODULE
There are 3 Active EQ modules (6) for each eq band: Treble, Mid and Bass. They are connectable to the Wire harness via the fast connectors numbered (9), (10) and (11).
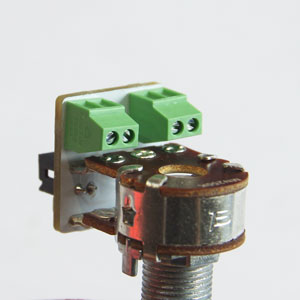
PICKUPS BLEND - MODULE
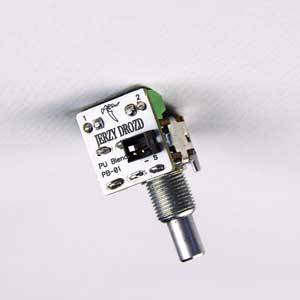
With our pickups blend module, you can connect two pickups without soldering using a small screwdriver.
We do recommend the small screwdriver from WERA company with dimensions 0,3x1,8 with ref 118004 available in the USA from KC Tool here https://www.kctoolco.com/wera-118004-1-8-x-60mm-kraftform-micro-slotted-precision-screwdriver/ and in Europe from FARNELL in this link https://uk.farnell.com/wera/118004/screwdriver-precision-slot-1-8x60mm/dp/1337797
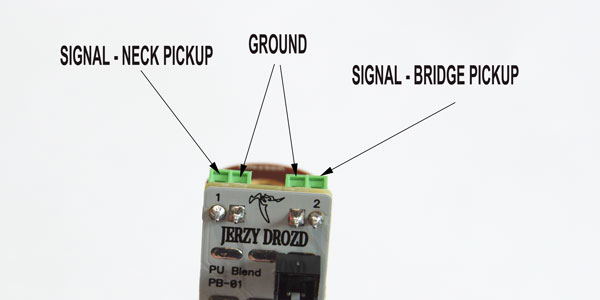
Both pickups ground wires should be connected on the inner side and the pickup signals on the outer side of the connector as showed below. If you preffer the blend potentiometer to work counterclockwise, then please flip pickups signal wires.
PASSIVE TONE - MODULE
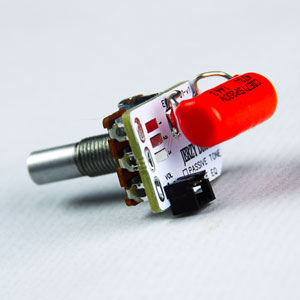
This module is optional and can be purchased separately. The passive Tone connects to the Master Volume module through the 2pin cable supplied with this package. The advantage of the Passive Tone module is that you can use passive tone functionality along with active tone EQ modules (6) or you can use it along with additional Active/Passive Switch module available separately.
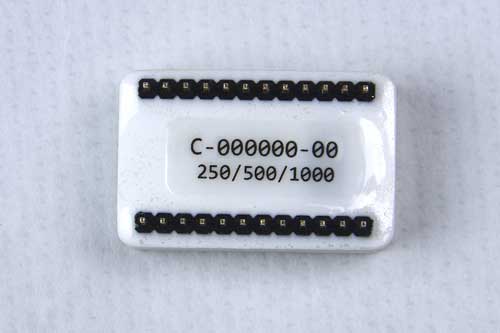
CHECKING YOUR COPPERSTONE SERIAL NUMBER AND ITS FREQUENCY VERSION
The serial number of your COPPERSTONE comes printed on the back side of the COPPERSTONE unit.
It has a C-XXXXXX-XX sequence. The second line below shows the 3 mid frequencies in Herz of your preamp. Example: 250/500/1000 (Hz).
It has a C-XXXXXX-XX sequence. The second line below shows the 3 mid frequencies in Herz of your preamp. Example: 250/500/1000 (Hz).
INSTALLATION PROCEDURE
Before installation
The COPPERSTONE bass guitar onboard preamp is not much sensitive to external electromagnetic fields, but some additional precaution must be taken. We strongly recommend screening the entire electronic cavity with copper foil or conductive paint to prevent any possible electromagnetic interferences. Please note that the COPPERSTONE baseboard should NOT touch directly such a surface. The baseboard should be fixed to the inside cavity with double stick tape or hot glue to prevent direct contact with electromagnetic protection.
1) INSTALLING THE POTENTIOMETERS
Place the master volume, blend and EQ potentiometers in place inside of your instrument. If you ordered your COPPERSTONE with Passive Tone Module, place this module inside of your instrument as well.
2) INSTALLING THE OUTPUT JACK & BATTERY CLIP
Replace your bass guitar output jack with the new one supplied with COPPERSTONE.
3) CONNECTING THE COPPERSTONE BASEBOARD ALONG WITH THE WIRE HARNESS
The correct way to connect your COPPERSTONE baseboard with THE wire harness is shown on the image below. Please note that the baseboard 30pin connector has lateral and frontal ribs to prevent misinsertion
4) PLACING THE COPPERSTONE INSIDE OF YOUR BASS GUITAR
Place the COPPERSTONE with its baseboard in the place inside of the electronics cavity. COPPERSTONE can be placed flat on the bottom of the cavity or vertical on the wall. Please choose the space where all wires to master volume, EQ potentiometers, Output Jack and Battery clip reach all these components. For example, that space can be in the middle between all potentiometers.
As stated at the beginning of the installation process, the COPPERSTONE baseboard should not touch directly internal copper foil or conductive paint. Please use double stick tape or hot glue with a hot gun to fix the baseboard in place.
5) CONNECTING ALL ELEMENTS
Once potentiometers, output jack and battery clip are in place and COPPERSTONE with baseboard is fixed inside the electronics cavity. You can connect all elements altogether.
- Connect Master Volume Module (4) to 6pin baseboard connector (8)
- Connect all 3 Active EQ Modules (6) to 3pin baseboard connectors (9) (10) and (11)
- Connect Output Jack (16) to 4pin connector on MasterVolume Module (4)
- Connect Pickup Blend (5) to one of the 2pin connectors of Master Volume Module (4) use supplied 2pin cable (14)
- Connect Battery Clip to 2pin connector (12) on COPPERSTONE baseboard (2).
- Install Mid frequency selector in its place.
- Connect both pickups to Blend Module (5)
Additional Modules
- Connect Passive Tone Module to one of the 2pin connectors on the Master Volume Module (4). Use supplied 2pin cable (14)
- Connect FLAME Module to 2pin connector (13) on COPPERSTONE baseboard (2).